Showing posts with label finished object. Show all posts

Saturday, February 25, 2012

Free Motion Quilting, Finished Supernova!

So I got to do something two weekends ago that I've wanted to do ever since I started quilting. I took a free-motion quilting class at Bernina Connection, one of Tallahassee's local quilt shops (in fact, I think it's our only one now... my Viking dealer does not sell fabric). I finally got the chance to take it--it was available on a Saturday, that I didn't have a math competition, so I jumped on it!
The class was taught by Gail Renna, who taught techniques she learned in workshops from Diane Gaudynski. The different techniques were fillers.
Here's the folded blankets pattern:
DSCN3939
I don't remember what she called this one, but it's something like Christmas trees:
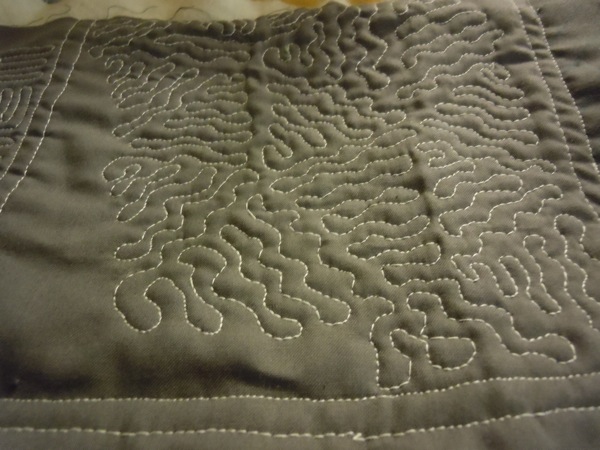
DSCN3940
Here are some... scallops, maybe?
DSCN3941
These are supposed to be bananas. This one was really, really hard for me to do.
DSCN3943
There was one more that I didn't take a picture of, because I didn't have time to get much done of it. It looked like little overlapping circles.
I am REALLY glad I got the chance to take this class. It wasn't my first time trying FMQ, but I was able to gain a lot of confidence with it. Then I came home and did some more!
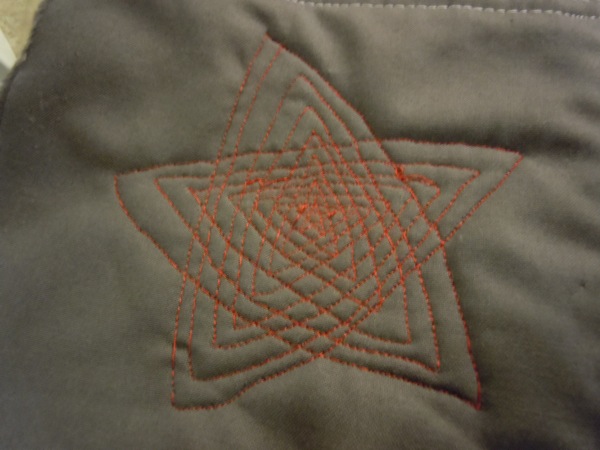
DSCN3944
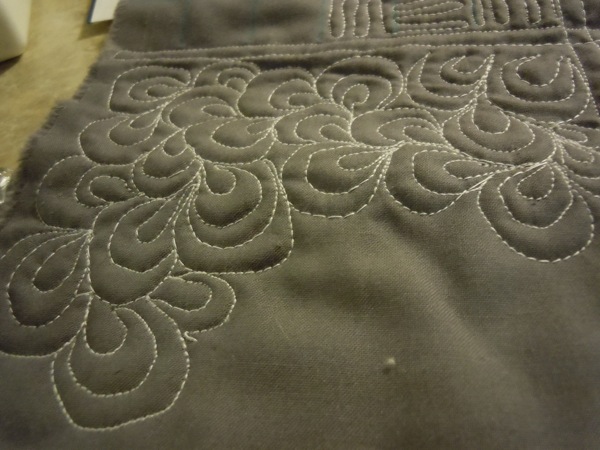
This one is Superstar, from the Free Motion Quilting project. I had a very hard time keeping the lines evenly spaced and straight. I'd like to try this one again.
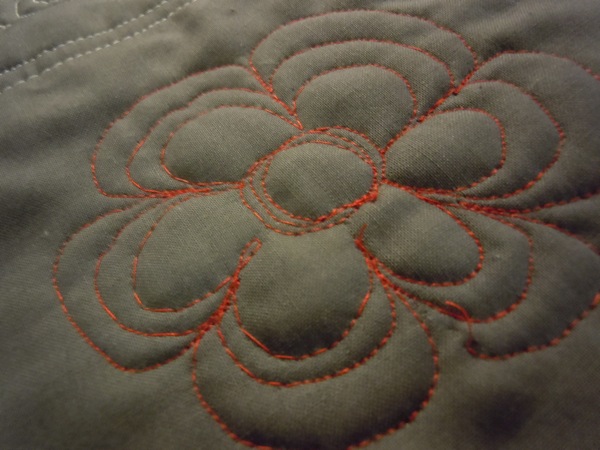
DSCN3947
This is the Loopy Flower from Oh, Fransson. I like this one a LOT and I'm going to use it for my Across the Sea quilt when that's ready (almost there!)
DSCN3948
This one is Peppermint Candy, also from the Free Motion Quilting Project. I had pinned this one a while ago, planning to use it for the Christmas quilt for my mother-in-law. Practicing it confirmed that I do want to use it--I like it a lot!
I had issues with tension once I got home, until I stopped for the night and started preparing the machine for piecing instead of quilting. At that point I realized, hey, wait! I never put my feed dogs down! Oooops...
I'm still not sure what thread I want to use for FMQ. I've got some Aurifil that I bought for the Christmas quilt, and that's the red that I was using. The white is Mettler Silk-Finish Cotton. I do like the Aurifil a lot, but it's nearly ten dollars per spool! I can't really justify spending that much money for thread. I'm ordering some of the Connecting Threads cotton for my next quilt, and I'm going to try that out, but I'm worried that it's a little thick. The Mettler is also somewhat thick. But I'll keep trying to find a thread I like that isn't going to break the bank.
I also finally finished putting the binding on the Supernova quilt for my mom!
DSCN3990
I bound it in a yellow print from Connecting Threads, one that was the same print as several of the green and orange fabrics in the quilt. I attached the binding with a blanket stitch with green thread. I wish I hadn't done that, because I don't think my binding skills are really up to snuff enough to use contrasting colors. The stitching turned out a little crooked.
DSCN3993
Also, the backing ended up with some wrinkles in it. One tip that I learned in the FMQ class was to starch your quilt back before basting, and I'm definitely planning on doing that in the future.
Now all it needs is to be washed, and then I'll send it to my mom! She's looking forward to getting it. :)
Linking up to:


Saturday, October 15, 2011

100 Quilts for Kids--done!

Just in time, too--today is the last day of the last link-up!

DSCN3414

This is the Storytime Squares quilt-along pattern. I LOVE this pattern, I LOVE how quickly it comes together, and it will definitely be a go-to pattern in the future!

I've already posted about how much I loved putting together the quilt top. I also used this quilt as my first attempt at free-motion quilting. DSCN3415

DSCN3416

Here are a couple of close-ups of the quilting. It's not nearly as bad as I expected it to be--I'm going to continue practicing with the Free-Motion Quilting Friday project. It's a LOT easier now that I'm using the appropriate foot on my machine, that's for sure!

I backed the quilt in a puzzle print fabric that supports autism awareness:

DSCN3418

The binding is a black fabric with rainbow stripes that I had in my stash--I think that it came from a garage sale where a lady was selling quilting fabric by the pound. I'm glad I had enough!

I did not take a close-up picture of my binding, because it does NOT look good. I machined on the binding on both the top and the bottom because I was short on time, and I don't think I'll be doing that again. This is the second time I've done that and I haven't been happy with it either time. Maybe I need to try binding clips instead of pins and that would give me a straighter binding on the back, but I think hand-sewing it on would have looked a lot better. Also, there were a couple of places where the backing fabric got folded over and the edge stuck out, and that wouldn't have happened if I had been hand sewing. I will take the time to do the hand-sewing next time.

This quilt, along with my Sunkissed Squares quilt finished a couple of months ago, are both going to Newborns in Need, which provides quilts to sick or impoverished babies. My local chapter is doing a Moses Basket project to encourage safe sleep--this area has a really high infant mortality rate, which has been linked to lack of a safe place for babies to sleep. Hopefully both these quilts will be going to babies and families that need them!

I've not had tons of time to sew recently with everything going on at work, but I've been working on a mug rug for a swap and a couple of blocks. Today on the agenda is finishing up the mug rug, and FINALLY getting back to the Skill-Builder Sampler quilt-along, I hope! I also need to get back to quilting my Supernova quilt. I'll do that while listening to the FSU football game--we don't have cable and it's only on Sun Sports, which we don't get, but I like the radio announcers better anyway. Then it'll be time for my school's football game--it's homecoming! And we're hoping to win our first game of the season... we're 0-4 right now. It's a unique experience to have a pep rally at which the football team is not mentioned in the slightest. :)

Part of homecoming is spirit week, of course! I don't always dress up for spirit week (I'm not particularly a fan of Wacky Tacky Day, which we seem to have EVERY year) but I got into it this year. The best day of all was yesterday--Dress like a Celebrity/Movie Character Day! 2011 10 14 11 21 58 56

I'm the one on the right :) I dressed up as Hermione--one of my students lent me the Gryffindor robe, though now I want one of my own. The tie and wand came from Party City, and I wore a white button-down, black skirt, black tights and flats. Not pictured is my 2001 Florida Statutes book wrapped in a brown paper cover to pretend that it's Hogwarts, A History. :) I had a great time.

And just to leave you in the mood for Halloween... I am one of THOSE dog owners. DSCN3384

Peanut is wearing candy-printed pajamas, and Izzy is wearing a t-shirt with a ghost on it. They were less than happy.

DSCN3390

Love those puppies. :) Have a great week! :)

Sunday, September 18, 2011

For the Love of Solids... sent and received

So I signed up to participate in the For the Love of Solids swap on Flickr. I've posted a little bit about my project for this swap already--well, now it is FINALLY finished and in the mail.


DSCN3292

This is a 27" by 27" wall hanging. I used 8 different colors of solids--mostly Kona but a couple were from Connecting Threads. The quilt block was from here (and, not to toot my own horn or anything, but how much better does this look in solids than in the fabric used in that quilt?) and the background is a coal gray from Joann's. I handquilted by outlining the whole way around the outside of the quilt and inside the larger gray squares with charcoal embroidery floss. Then I cut strips of each color used (about 10 inches long, I think) and pieced them together to make a scrappy binding. I also added folded triangles on the back for my partner to hang it.

The pros of this quilt: I made almost NO mistakes in piecing these blocks. I can't stress how amazing this is. When considering that the first block I considered making was this one (haha, yeah, I'm crazy) this was infinitely preferable.

The cons: I'm not necessarily thrilled with the color layout--I wish I had spent some time planning out what color mixes I was going to use in advance instead of jumping right in. Also, the blocks aren't particularly well aligned and the binding is not sewn on perfectly. I attached the binding by machine, and didn't have anything to put in the bobbin that would blend in with the binding (now, after it's done, I know to use monofilament thread) so instead I used the same dark gray on the top and bottom, which doesn't look great in my opinion. But hopefully my partner will like it.

Close-up of the hand-quilting:

DSCN3293

I am not a fan of hand-quilting. If it weren't for the fact that my partner specifically said that she loves hand-stitching, I wouldn't have bothered. I much prefer the process of quilting by machine.


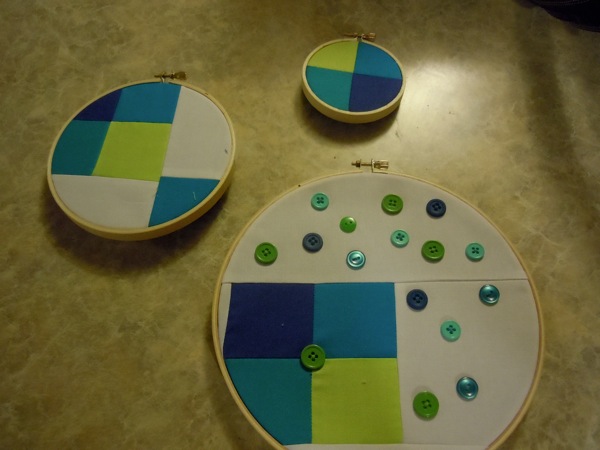
We also had to include a small item in there, which did not have to be made by hand. My partner had mentioned that she wouldn't mind receiving a hoop, so I got a variety of sizes and made three hoops, all using a four-patch in blue, teal, and chartreuse.

DSCN3294

This was my first time making a decorative hoop, too, but I think they turned out pretty well. I wish I had read the tutorial ahead of time so that it would have been easier for me to trim the edges and whatnot. I also threw in 4 fat quarters of Loulouthi. I shipped it yesterday, and I'm hoping she likes it!


On Thursday I also received my package.

DSCN3291


This was a GREAT package! A tote bag made with linen and a rainbow of solids, including lots of pinks. A matching zippered pouch. A cute embroidered keychain, and a charm pack of City Weekend by Moda. I love all of it and think that my partner (chloeandme) did a fantastic job! I must admit, though, that I had a whole lot of feelings of inferiority when I got it--all the piecing, topstitching, etc. is SO perfect! I hope mine is that good someday.


Sorry for the lack of blogging lately--sewing is happening, but not with any regularity, and I have so much work to do all the time that I feel guilty about taking time out to sew and/or blog. :( Is it winter break yet?

One more thing--thank you SO much to Sharon of Craizee Corners! I won a giveaway on her blog and received two Tula Pink patterns in the mail a couple of weeks ago. I'm really looking forward to using them! :)

DSCN3289

Thanks for reading :)

Monday, August 1, 2011

Finished--my very first (real) quilt!!!

(Note: When I say real, I mean that it goes in the traditional order, making a quilt top, then quilting together with backing and batting, then binding the edges--I've made a rag quilt prior to this.)


I did it!!!


DSCN3048


My first official quilt is finally finished.


I started this quilt back in March over my spring break. I actually finished the top in a day--it's small and the piecing was relatively easy. Then... it sat. And sat. And sat. I didn't know how to back it, how to quilt it, I was clueless. I did eventually pick out a backing fabric I was happy with (First Impressions by Anna Maria Horner, from the Innocent Crush collection), but still, I knew I couldn't quilt it on my old machine, so it sat for a while, and I was still unsure about binding fabric. Then, I got a new machine, complete with walking foot, my mom came and visited me and looked through my fabric and found a binding fabric that would work (also a backing fabric for the Supernova, too, more on that later), and I got motivated again... and here it is!


DSCN3049


DSCN3050


DSCN3051


DSCN3052


DSCN3043

(This one is post-quilting, pre-binding.)


I love this pattern and would like to make the full-size quilt. This one is baby-sized--full-sized would involve 4 of these being sewn together in a square.


What did I learn from this process? Tons!

  1. Seam allowance is important if you want your pieces to line up right--something I've relearned repeatedly...
  2. It is a good idea to mark your quilting lines, even if you're doing echo quilting--I have a couple of wonky corners in there.
  3. Sew the binding to the front of the quilt BEFORE you trim the backing and batting. Instead of doing that, I sewed 1/4" from the edge of the top, all the way around, but then when I sewed on my binding, that first line of stitching showed up.
  4. Try to sew in a straight line when sewing on the binding.... I had to go back and handstitch it on to the front in some places because it wasn't actually attached to the quilt top, just the backing and batting.
  5. Words can't express how much I need a 1/4" piecing foot for my machine...
  6. If you sew too far on a mitered corner, or backstitch too much, then you won't be able to fit the binding over the corner. Learned that one from experience.
  7. (on a related note) Use 2.5" wide binding strips, NOT 2.25"--I feel like that would have made my life ever so slightly easier.
  8. Handsewing takes a REALLY long time. But it looks really nice. I need to decide which is better--quick and dirty, or beautiful and slow?


This quilt is most likely destined to be part of the 100 Quilts for Kids project, since there are no babies in my immediate future and I don't know of anyone having a girl baby that would like these colors. They are very, very me--meaning lots of brights and very bold. (The girls at my knitting group joke that they can always predict what colorway of any yarn I'm going to pick out... it's the one with the most pink and the brightest colors!) And not many people I know share my taste in colors. So off to charity it is--specific charity to be determined later (I think our NICU unit might want blankets? Not sure.)


Stats:

Pattern: Sunkissed Squares, from Moda Bake Shop

Fabric for top: off-white background, jelly roll from Joann Fabrics (I really wish I'd bought like 5 of these when I first found it, I love these fabrics)

Backing: First Impression from Innocent Crush by Anna Maria Horner

Binding: some stuff from Hobby Lobby that I got for 3 bucks a yard

Size: 32" by 32"

Quilting: echo quilting around inside and outside of each square, done by me on machine


This is my entry for the Gen X Quilters Summer Fair, and I'm also linking up to {Sew} Modern Monday and Fresh Sewing Day at Lily's Quilts.


Gen X Quilters Summer Fair

Fresh Sewing Day


Go link up your summer quilts (and recipes) too!


Wednesday, July 6, 2011

WIP Wednesday

Hi all! Back from vacation, lots of exciting crafty things going on... ready to get back to the sewing machine! So here are my WIPs for the week:
Finished:
I made a skirt! I did not finish it in time for skirt week, oh well. I'm just proud that I finished it. DSCN2552

DSCN2553

No cute pictures of me modeling it, but take my word for it, it DOES fit and it looks pretty good. I still need to sew the clasp onto the waistline, but other than that it's completely done.
The pattern was a "learn to sew" pattern from New Look (I posted about it in my previous post) and it was straightforward and easy, though the fact that I had to make it in a size 18 still rankles.

Continuing WIPs:
The Supernova is getting to the finishing point!
DSCN2540DSCN2540
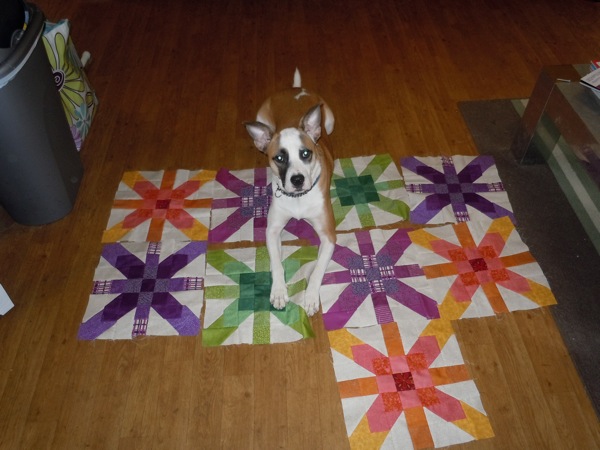
I mentioned previously that I wanted to make three more blocks so that I could have 3 of each color, 3 rows of 4. At the point when I took this picture (pre-vacation) I was stalled because I was waiting for the last little bit of fabric I needed to arrive. I'd run out of the lime green in the corners of the green block, the pink in the corners of the pink block, and the dark purple in the diagonals of the purple block. I ran into trouble when I realized that Connecting Threads had sold out of the lime green! But fortunately, they still had precuts of all the fabrics, and the amount I needed was small enough that a charm pack did the trick. (Of course, now I have charms of all the other fabrics in the line left over...).
DSCN2541
Here's a tentative layout for how I plan to arrange the blocks, once I've finished the last three. (Peanut really likes it, as you can see...) Then I just need to do the border and it'll be time for me to quilt my VERY FIRST QUILT!! Gulp. I'm terrified. I'm debating waiting until I take the long-arm quilting class in August, but I'd really like to finish SOMETHING this summer.

New: Kaleidoscope Quilt-Along
I wasn't sure about doing this one. Then I saw this and it inspired me. The background color (teal in this picture) will be the charcoal gray. The foreground color will be the various pink and teal prints.

DSCN2549

Garden Fence Quilt:

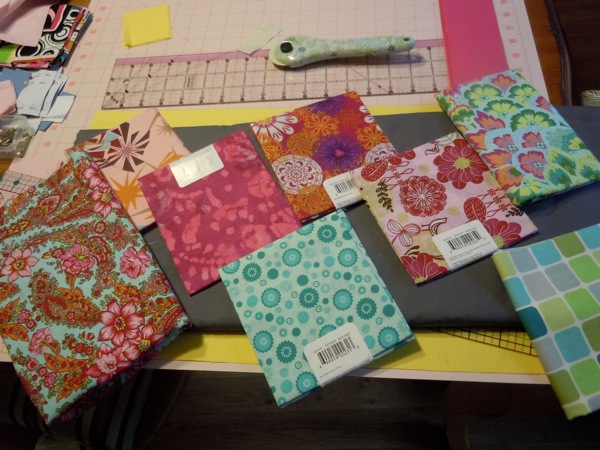
The block is from a tutorial from Hyacinth Quilt Designs--I LOVE it! I bought this stack of fat quarters from Sew Fresh Fabrics a while ago in a bundle with a yard of June Jubilee by Alexander Henry. I really love the fabric but I wasn't sure what to do with it. I definitely think, though, that this is a great fit of fabric and pattern! I've cut out enough for 4 squares of each color, but I've run out of all the solids. I'm going to hold off on ordering more until I have some of the squares put together.


(Both of these pictures are saved from Sew Fresh Fabric's Etsy store.)

I have super exciting sewing machine news too, but that will come in a later post!

(I also switched over to Blogger, with the idea that it's a little more user-friendly than Wordpress. All previous posts have been copied over!)

Linking up to Freshly Pieced!

Thursday, June 16, 2011

Baby shower gift, learning new things, Skirt Week update, pattern sizing rant

First things first--I used some stash fabric (a cute remnant that I picked up from JoAnn's) to make a baby shower gift for one of my coworkers! I started out with the plan to make a bib, burp cloth, and onesie. The onesie did not work out. So I revised the plan, and instead made a portable changing pad and a wet bag.

DSCN2497

Bib--tutorial from Chickpea Sewing Studio.

DSCN2498

I don't know why I can't turn that one the correct direction! Burp cloth tutorial from Chickpea Sewing Studio, though I think I referenced several others.

DSCN2499

Changing pad, folded up.

DSCN2504

I LOVE this button!

DSCN2505

Unfolded to see the inside. I can't find the tutorial I used! Hopefully it's still in my browser history on my laptop.

DSCN2508

Wet bag! Tutorial from Dilley Dalley Diapers.

DSCN2509You can see the PUL lining here--finally found some in white, and I will be using it frequently!

DSCN2511

The whole package.

DSCN2523And the mama-to-be opening it up!

Everyone was super-impressed that I made it and she especially loved the changing pad. It was a hit!

I mentioned in my last post that my sewing machine sucks. Well, here's the thing--my sewing machine is a very basic entry-level machine from Brother, the LS-2125. It was not intended for heavy usage and I'm using it a LOT. So I am in the market for a new sewing machine--I'm looking at the Pfaff Hobby 1142 or the Bernette 25 (goes to a PDF). There are so many things to think about--do I NEED the 155 stitches (including alphabet and numbers) that the Bernina offers? Do I need an automatic needle threader? Would I rather have mechanical (Pfaff) or computerized (Bernina)? So complicated! And since presumably I will own this machine for many years I want it to be a purchase that I don't regret.

In the meantime, I'm struggling with my old Brother, and I learned something new last night. I've had lots of trouble with the bobbin thread--it catches at the end of nearly every seam and requires me to rethread the machine almost every time, which majorly slows me down. I know I'm threading the machine correctly. But--did you know there are different types of plastic bobbins?? I didn't! I've just been purchasing bobbins that look right, but not necessarily the ones that are intended for my machine--meaning that the bobbin thread jams! Total breakthrough! So I'm ordering the correct type (Brother Style SA156, for future reference) and going to mail all the wrong ones to my aunt, who owns an alterations shop and about 15 different sewing machines and should presumably be able to put bobbins of nearly any type to use!

Skirt Week: almost over and I have yet to complete one single skirt! But I'm working on it. I'm using some stashed linen or linen-look fabric, not sure which, to make Simplicity 2314 (the medium-length version). Which brings me to my rant. How on earth do they figure the numerical sizes on patterns? I was a good little sewist (I kinda hate that word) and measured my hips and waist, as I was supposed to. My 33-inch waist and 42-inch hips somehow resulted in me having to make the LARGEST size of the pattern--a size 18! That's absolutely ludicrous. That's 4 sizes above my usual size 10. I cut out the waistbands, and it is the correct size for me, but Simplicity, what are you thinking? How on earth do you think that making women sew a size drastically larger than they're used to is a good idea? And no, the number doesn't really matter, but still--it's maddening.

And finally, I'm participating in a new swap (button is in the sidebar)--the Gen X Quilters Spoonflower Swap. For those of you who haven't heard of Spoonflower--you can design your own fabric and upload it to the website, then you (or anyone else) can purchase your custom printed fabric. I'm definitely not a designer but I'm loving a lot of the stuff on there--it's so pretty! It's a little pricey which has kept me from ordering thus far, but I'm looking forward to getting charms of 28 different fabrics from the swap. (You order one yard, cut it into 56 charms, mail them off, and get a charm pack back with 2 of each charm.) It should be fun! Here are some of the ones that have caught my eye so far.

And finally finally, Happy Quilting is hosting a sponsor giveaway from Sew Obsessed fabric--because I need another resource for pretty fabric like I need a hole in the head! Go here to enter the giveaway.

Have a good day, everyone!